When installing a new car stereo, the first step is to make sure how to connect radio wire harnesses with the adapter you intend to plug into your vehicle.
Making proper and durable wire connections is one of the greatest concerns you must deal with.
Thus, using one or more methods can ensure your connections remain intact and effective for years.
It will guarantee your new stereo works as it should.
Get Your Free Sample!
Explore our custom services now. Email us at [email protected] for more details.
Get Your Free Sample!
Explore our custom services now. Email us at [email protected] for more details.
How to Splice Two Wires
Most connections involve interweaving the ends of two wires together.
We can look at some aspects users should consider when undertaking this task.
And it is up to you to decide which method works best.
1. Soldering Two Wires
Soldering wires is the most effective way to ensure a solid connection.
You can do this by heat shrinking the tubing that insulates and protects the connection.
In most cases, the process will begin with you using a wire stripper to remove the insulation at the ends of the wires.
The following steps should help you navigate your way through the soldering process:
- The first step is stripping about half an inch of the insulation material from both ends of the wire using strippers, which will expose the copper strands beneath.
- Next, twist the wire strands together to prevent fraying and simplify your work.
- Now place some heat shrink tubing over the end of one wire. Ensure you slide it far enough to prevent it from heating while soldering.
- Proceed to twist the two wires together. This step isn’t to make a secure enough connection but to pave the way for the soldering process.
- Next, heat the wires from beneath using a soldering iron. Allow the solder to flow through the wires from above.
- This step ensures you get to the temperature, and the solder flows through the connection.
- Then test your connection and slide the tubing on the open wires.
- Always apply only a little heat to prevent the wires from melting into the tubing.
2. Making use of Posi-Product Connectors
One of the best things about Posi-Product connectors is that they are easily attached and firmly placed.
Most users also prefer this method because of the integrity of the connectors and the simple process involved with the technique.
Below are the steps to connecting two wires using a Posi Connector:
- First, strip off half an inch of the insulation material to expose the copper strands beneath.
- Take your POsi tap made of three parts and unscrew the top smaller part.
- Next, twist the wire strands and slide the Posi tap end over the naked wire strands.
- Proceed to screw the remaining Posi tap body back into the top piece to crimp the wires.
- Once it’s secure, you can unscrew the bottom part of the Posi tap connector, exposing the piece that pierces your existing wire and the piece that holds the existing wire in place.
- Next, slide the bottom part over the existing wire you want to tap into, then screw the remaining Posi connector with the newly attached wire you want to tap into to get a secure connection.
3. Crimping wires
Contrary to what some believe, crimping wires can help create a fairly solid connection.
However, it would help if you had crimp caps and a crimping tool to undertake the task.
Nonetheless, one of the potential drawbacks of this process is that the caps can shake loose if you don’t crimp them tightly enough.
Therefore, you should give them a good tug before installing your stereo.
To crimp two wires, follow the steps below:
- First, expose the copper strands beneath by stripping off half an inch of the insulation material on each wire.
- Take the two wires and twist the ends together. Ensure you don’t leave any loose copper strands.
- Next, slide a crimp cap over the twisted wire stands. Ensure the cap covers all the wires.
- Finally, squeeze down over the metal sleeve inside the crimp cap using a crimp tool to create a secure connection.
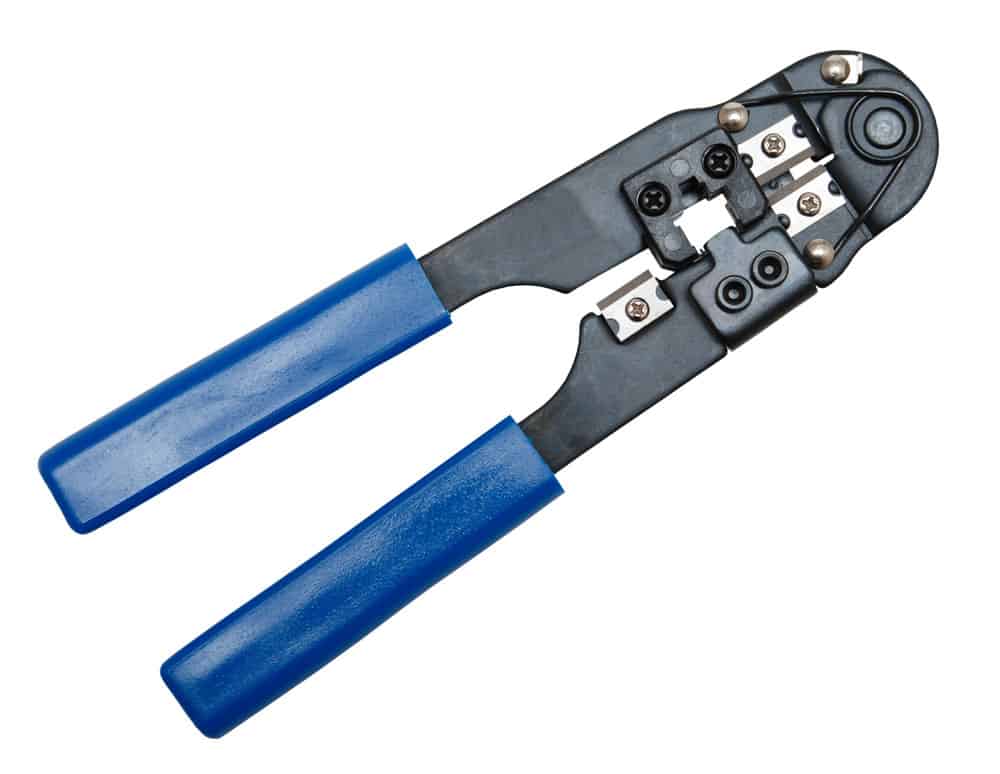
Caption: Crimping Tool
Ways of Tapping into Existing Wires
Sometimes, you also need to tap into an existing wire.
And linking a new wire to the middle section of an existing one is what we call tapping the wire.
There are also several ways to safely and securely carry out the process.
Based on your preferences, you can opt to go with either one of the following:
1. How to Connect Radio Wire Harnesses: Using Posi-Tap connectors
In the same way, you would handle other wire connectors; the Posi-Tap connectors are straightforward for anyone trying to create a secure tap with another wire.
Follow the steps below to tap into a wire using Posi-tap connectors.
- Begin by stripping off about half an inch of the insulation material to expose the copper strands beneath.
- Use your Posi tap made of three parts by unscrewing the top smaller part.
- Twist the wire strands together and slide the Posi tap end over the naked wire strands.
- Next, screw the remaining Posi body part back into the top part to crimp the wires in place.
- Proceed to unscrew the bottom part exposing the piece that pierces the existing wire and the piece that holds the existing wire in place.
- Now slide the remaining part over the existing wire you want to tap into and screw the rest of the Posi tap connector along with the newly attached wire onto the wire you want to tap into, creating a secure connection.
2. How to Connect Radio Wire Harnesses: With a soldering process
If you are familiar with the various aspects of wire connecting, then you know that soldering is considered an old-version methodology of getting the job done by most.
Nonetheless, it is still relevant today and often gets the job done.
Follow the steps below to tap into a wire using the soldering process
- The first step is to strip off about half an inch of the insulation to expose the copper strands below.
- Next, twist the strands together to prevent fraying and make working with them easier.
- Now using a pair of strippers, cut through the jacket material to expose the wire strands beneath. Be careful not to cut through any of the wires.
- Next, pull off the wire jacket to expose about a quarter inch of the copper strands.
- Proceed to twist the wire strands of the new wire and existing wire together.
- Now heat the wires from beneath with a soldering iron and flow the solder through from above. This step will ensure you get to the right temperature and fill the connection with solder.
- Finally, cover the portion of exposed wires with electrical tape to tap into your wiring harness.
3. How to Connect Radio Wire Harnesses: By a T-splice but no solder
T-splicing is also known as a mechanical splice.
It is one of the methods used to create a solid connection with the wires.
Sometimes, it can be the only way to ensure the job is done right.
It is one of the ideal processes to get good practice.
The steps below will assist you in tapping into a wire using a T splice and no solder.
- First, strip off about three-quarters of an inch of the insulation material to expose the copper strands beneath.
- Next, find the wire you want to tap into and slice open the jacket. Be careful not to cut through the wires. B bends the ire to start splitting the jacket to make it easier.
- Now try to separate the wire strands from the jacket material. Ensure about an inch of the inner wire strand is exposed because you’ll need to cut off the remaining jacket material to make it easier.
- Proceed opening up the middle of the naked wire strands, creating a space for a new wire to slide through.
- Take the new wire and slide it into the existing exposed wire.
- Follow by taking the wire end and dividing it into two halves to allow you to wrap both ends in different directions around the existing wire to create a tap without solder or any mechanical connections.
- Cover the exposed wire with electrical tape to create a secure connection.
Conclusion
For those undertaking their first installation, connecting wires can be intimidating.
However, the process is not that hard when you think of it.
One thing you need to do to ensure a successful outcome is to take your time and exercise caution when making the connections.
Contact Cloom Tech for the best wire harness services if you encounter any problems or inquiries.
Get Your Free Sample!
Explore our custom services now. Email us at [email protected] for more details.