TL;DR: Engine wiring harnesses prevent cascading electrical failures in automotive, agricultural, and industrial equipment. OEMs and equipment manufacturers choose between replica harnesses for legacy product support and custom assemblies for new designs or modifications. Wire gauge selection, connector specifications, and routing requirements determine harness reliability across your product line’s operational life.
Get Your Free Sample!
Explore our custom services now. Email us at sales@wiringo.com for more details.
What is an engine wiring harness, and how does it work?
An engine wiring harness routes dozens of electrical circuits through environments that hit 250°F, vibrate constantly, and get soaked with oil, coolant, and road spray. Without organized bundling, individual wires chafe through insulation, short against each other, and create warranty claims and field service costs that impact your bottom line.
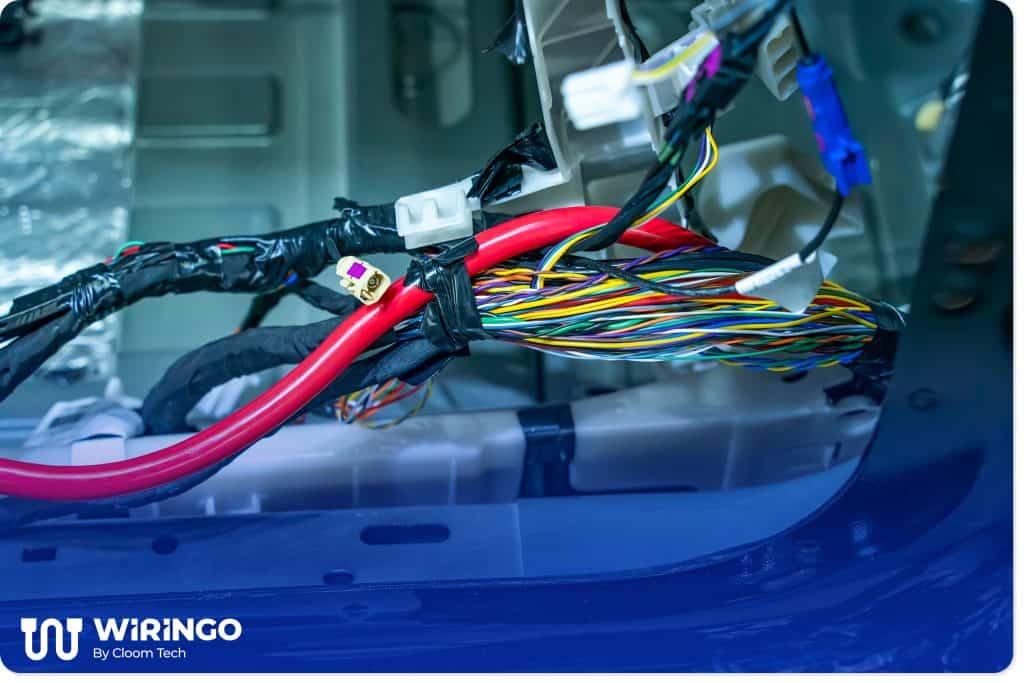
The harness bundles power-delivery circuits (battery-to-alternator, alternator-to-distribution), sensor signal wires (throttle position, MAF, O2 sensors), and control outputs (fuel injectors, ignition coils). Over-molded connector sections seal out moisture where corrosion starts. Protective sleeving prevents abrasion where the harness contacts mounting points and the engine block.
Production harness failures are predictable across equipment populations. Firewall pass-throughs crack from flexing. Valve cover routing exposes insulation to heat cycling. Battery terminal corrosion spreads to ground connections. Understanding these failure modes helps you specify harnesses that reduce warranty exposure and field service frequency. Operating environment determines replacement intervals: 15 years in dry climates, 8 years in salt-exposed regions.
Types of engine wiring harnesses and where they’re used
Vehicle electrical systems use separate harnesses for different thermal zones and service access points.
- The engine harness handles the harshest environment and the most important circuits. The engine harness terminates at the ECU, connecting fuel injector drivers, coil triggers, sensor inputs, and diagnostic communication lines. Temperature ratings hit 150°C minimum where the harness routes past valve covers.
- Battery harnesses route high-amperage charging and starting current through 4-gauge or larger conductors.
- Body harnesses distribute lower-current accessory power through smaller 18 to 22-gauge wires.
- Main harnesses branch from the bulkhead connector into instrument cluster feeds, diagnostic ports, and CAN bus lines that link body control modules.
- Airbag harnesses use twisted-pair shielded conductors to prevent electromagnetic interference from triggering false deployment signals.
- Door harnesses flex thousands of times. Wire strand count determines fatigue resistance at hinge points. 19-strand conductors outlast 7-strand wire in high-flex spots. Roof harnesses see less mechanical stress but face greater moisture exposure, requiring sealed connectors at all splice points.
- Chassis harnesses tie these assemblies into the battery distribution system.
Aftermarket manufacturers like Wiringo build custom cable assemblies that interface between OEM harness sections and modified components like turbo controllers, auxiliary fuel pumps, and upgraded lighting.
How to choose the right engine wiring harness for your vehicle?
Equipment manufacturers and fleet operators have two sourcing options: new old stock (N.O.S.) replicas for legacy equipment support or custom harnesses engineered to OEM specifications for new production or aftermarket programs.
New old stock harness from aftermarket suppliers
N.O.S. harnesses replicate original wiring specifications: connector pin counts, wire gauge, and color coding. Every terminal matches factory crimp style. Routing length matches factory clip positions along valve covers and intake runners.
- Exact replication eliminates fitment problems. Field service teams familiar with original equipment can complete installations without referencing technical documentation.
- Color-coded conductors align with service manual troubleshooting procedures, reducing diagnostic time and improving first-time-fix rates.
- Specification matching simplifies inventory management and technician training across your service network.
Most specialty suppliers offer N.O.S. harnesses with unlimited-mileage warranties, though these warranties become meaningless when five-year-old warehouse stock cracks during installation.
- Wire insulation degrades during warehouse storage. PVC jackets become brittle after five to ten years on the shelf, creating installation failures that generate warranty claims.
- Production runs for low-volume applications happen infrequently. Supporting legacy equipment or specialty applications requires forecasting replacement demand six to twelve months ahead through manufacturing cycles.
- This storage degradation matters when supporting legacy equipment with declining production volumes.
Pricing reflects reverse-engineering costs for discontinued specifications and low-volume production economics. Expect premiums of 40 to 60 percent over custom-engineered alternatives. Low-volume applications incur higher per-unit costs when tooling and engineering are amortized across small production quantities.

wiring harnesses
Factory-original custom wiring harnesses for OEM design
Custom harness manufacturers reverse-engineer OEM specifications and build assemblies with current-generation materials.
- Modern TXL wire insulation handles higher temperatures than legacy GXL insulation. Updated connector bodies resist heat cycling better than the original Packard-style terminals that crack under temperature swings.
- Material upgrades reduce field failure rates without requiring equipment redesign.
- Competitive sourcing keeps costs 30 to 50 percent below N.O.S. alternatives.
- Volume production amortizes tooling costs across larger production runs, improving unit economics for OEM programs and high-volume aftermarket applications.
This approach accommodates design modifications and product variants without separate engineering programs. Equipment upgrades requiring relocated sensor circuits or additional control modules get integrated during harness production. This eliminates field modification costs and maintains manufacturing quality control across product variants.
Supply chain quality variance is the real risk here. The $800 harness that fails in six months costs you $3,000 in warranty labor.
- Some suppliers reduce costs with wire gauges that meet minimum specifications but lack margin for voltage drop under load.
- Substandard connector terminals fail crimp pull tests that validate mechanical strength.
- Quality issues create warranty exposure that exceeds initial cost savings.
Supplier warranty terms range from comprehensive replacement guarantees to limited post-sale support. Procurement qualification should verify manufacturing capabilities: proper crimping equipment, quality verification systems, and documented process controls that protect your warranty exposure.
Supplier certifications indicate manufacturing capability and quality system maturity. ISO 9001 compliance demonstrates documented procedures for material sourcing and production verification. IATF 16949 certification adds automotive-specific requirements, including PPAP documentation and statistical process control that support your supplier quality assurance programs. Wiringo maintains both certifications and publishes component-level specifications: wire temperature ratings, connector manufacturer part numbers, and terminal crimp pull force data.
- This specification transparency supports your engineering validation and supplier qualification requirements.
- Request technical specifications before buying. Wire gauge should match or exceed OEM specs. Dropping from 16 AWG to 18 AWG saves the manufacturer money but creates voltage drop under high current.
- Connector bodies from Aptiv, TE Connectivity, or Molex mean quality components. Temperature ratings matter near exhaust manifolds, where 150°C is the minimum acceptable threshold.
Certifications tell you a supplier has documentation. What matters more: do they publish actual crimp pull force data, or do they just say ‘meets industry standards’? Suppliers who hide specs are hiding problems.
Get Your Free Sample!
Explore our custom services now. Email us at sales@wiringo.com for more details.
Specifying harnesses for reliability and serviceability
Most harness failures trace back to three specification mistakes: underrating temperature exposure, undersizing wire gauge to save $2 per harness, and ignoring service access until technicians are removing intake manifolds for a $40 part.
Environmental requirements – Operating temperature range determines insulation material selection. Continuous operation near exhaust components requires 150°C minimum-rated insulation. Chemical exposure from hydraulic fluids, DEF, or industrial solvents requires cross-linked polyethylene (XLPE) or fluoropolymer insulation rather than standard PVC or GXL compounds.
Service access – Harness routing affects field service time and costs. Designs requiring intake manifold removal or major disassembly for harness replacement increase service labor 3x to 4x compared to accessible routing. Modular harness designs with serviceable connector sections reduce replacement costs by limiting replacement to failed segments rather than complete assemblies.
Voltage drop specifications – Circuits require a specified maximum voltage drop under load. Power delivery circuits tolerate a 0.5-volt drop maximum. Sensor signal circuits need less than 0.1 volt drop for accurate ECU readings. Wire gauge selection affects voltage drop: undersized conductors that meet minimum ampacity ratings still create performance problems from excessive voltage drop during high-current operation.
Connector selection – Sealed connector bodies with secondary locks prevent moisture intrusion and maintain terminal contact through vibration. IP67-rated connectors withstand temporary submersion. IP69K-rated connectors handle high-pressure washdown in food processing or agricultural applications. Connector pin count affects service complexity: 40-pin connectors require careful documentation and technician training compared to multiple smaller connectors with clear circuit separation.
Ground path design – Multiple ground paths with redundant connections prevent single-point ground failures. Ground strap gauge must handle the combined current from all circuits sharing that ground path. Ring terminals with star washers maintain contact through vibration better than spade terminals. Stainless steel hardware prevents galvanic corrosion at aluminum chassis ground points.
Engine wiring harness repair cost: Parts, labor, and when replacement is cheaper
Field service costs for harness repairs range from $200 to $500 per service event for single-circuit failures. Complete harness replacement runs $700 to $3,000, including parts and labor, varying with equipment accessibility and technician time requirements. These field service costs compound across equipment populations: a failure mode affecting 5% of deployed units creates significant warranty exposure on production volumes exceeding 1,000 units annually.
Service labor requirements scale with equipment design. Design-for-service principles applied during equipment development reduce these service times and associated warranty costs.
| Engine Configuration | Harness Routing Complexity | Service Time | Labor Cost Impact |
| Open engine compartment | Straightforward access | 2-4 hours | Lowest warranty exposure |
| Transverse engine | Under intake plenums | 6-10 hours | Moderate labor costs |
| Turbocharged/intercooled | Around the turbo and intercooler piping | 12-16 hours | Highest service costs |
Field installation by undertrained technicians creates quality risks.
| Installation Error | Failure Mode | Service Impact | Cost Consequence |
| Incorrect pin assignments at multi-pin connectors | Intermittent faults | Repeat service visits | Multiple diagnostic cycles |
| Improper routing near exhaust components | Insulation failure after initial operation | Premature harness replacement | Complete reinstallation labor |
| Inadequate crimp connections | Vibration-induced failure | Warranty claims | Exceeds initial service cost savings |
Most harness suppliers limit warranty coverage to installations performed by qualified service facilities. This warranty structure protects manufacturers from installation-related failures while creating service network requirements for equipment OEMs and fleet operators.
Qualified installation procedures verify electrical continuity circuit by circuit before returning equipment to service. Technicians confirm proper pin insertion at each connector, verify wire routing clearance from moving components, and validate ground connections below 0.5 ohm resistance. Documented installation procedures reduce comebacks and protect warranty coverage.
Engine wiring harnesses in manufacturing and the supply chain
Lead times and production planning – Custom harness production requires 8 to 16 weeks from purchase order to delivery for initial orders. Repeat production time shortens to 4 to 8 weeks once tooling is in place and specifications are validated. These lead times affect inventory planning and new product introduction schedules. Safety stock requirements depend on failure rates in deployed equipment populations and service level targets.
Minimum order quantities – Custom harness suppliers typically require 100 to 500 piece minimums for initial production runs to amortize tooling costs. Volume production of 1,000 or more pieces annually qualifies for reduced per-unit pricing as tooling costs are spread across larger quantities. Low-volume applications incur higher per-unit costs or require longer lead times when orders are combined across multiple customers.
Quality validation – First article inspection verifies harness specifications match engineering requirements before volume production. Dimensional verification confirms routing length and connector locations. Electrical testing validates continuity, insulation resistance, and voltage drop under specified load conditions. Pull testing verifies terminal crimp strength meets specification minimums. PPAP documentation packages support supplier quality assurance programs for automotive and industrial OEMs.
Packaging and logistics – Harness packaging prevents damage during shipping and storage. Coiled harnesses in individual poly bags with desiccant packs prevent moisture exposure. Rigid packaging prevents crush damage to connector bodies during palletized shipping. Proper packaging reduces receipt inspection failures and protects component quality during warehouse storage.
Traceability requirements – Lot codes and serial numbers enable field tracking for warranty analysis and recall management. Component-level traceability links wire lot codes and connector date codes to finished harness assemblies. This traceability supports root cause analysis when field failures concentrate in specific production lots.
The suppliers who consistently hit 8-week lead times? They’re running repeat jobs for established customers. First-time orders almost always slip unless you’re paying expedited fees.
Engine wiring harnesses
How to pick a wiring harness that survives heat, vibration, and long-term stress
Engine harness failures concentrate in predictable failure modes across equipment populations. An undersized wire gauge creates a voltage drop under load. Inadequate insulation temperature ratings cause degradation near exhaust components. Unsealed connector bodies allow moisture to enter, which can corrode terminals. Understanding these failure mechanisms informs specification decisions that reduce warranty exposure: firewall pass-throughs need flex-rated wire and strain relief, valve cover routing requires high-temperature insulation, ground connections need corrosion-resistant hardware, and proper torque specifications.
Quality manufacturing addresses these failure modes during design and production. Wire gauge selection prevents voltage drop under maximum specified load with a margin for component tolerance variation. Temperature ratings of 150°C minimum withstand continuous exposure near exhaust manifolds and turbo housings. Sealed connector bodies with secondary locks prevent water intrusion and maintain terminal contact through vibration across equipment operating life.
Suppliers with ISO 9001 and IATF 16949 certification maintain documented quality management systems covering material selection, process controls, and production verification. High-temperature cable assemblies use insulation compounds rated for continuous exposure to temperatures that degrade standard automotive wire within weeks of operation. Increased strand count at high-flex points prevents fatigue failures where harnesses cross articulation points between chassis and engine, extending operational life in high-cycle applications.
- Supplier selection should prioritize manufacturers who publish component-level specifications rather than generic performance claims. Published wire temperature ratings, connector manufacturer part numbers with date codes, and terminal crimp pull force data demonstrate engineering discipline and support your supplier quality assurance requirements. This specification transparency enables apples-to-apples supplier comparisons and reduces procurement risk.
Harness failures create warranty costs that exceed component prices.
Contact Wiringo for engine harnesses engineered to your specifications with documented materials and production timelines that meet your launch schedules.
FAQ
What certifications should I require from engine wiring harness suppliers?
Require ISO 9001 certification as a baseline for documented quality management systems. IATF 16949 certification adds automotive-specific requirements, including PPAP documentation, statistical process control, and production part approval processes. UL recognition demonstrates compliance with safety standards for wire and cable products. RoHS and REACH compliance confirm the restriction of hazardous substances for equipment sold in regulated markets.
Request certificate copies with current validity dates during supplier qualification. Suppliers maintaining multiple certifications demonstrate investment in quality infrastructure that reduces your procurement risk and supports your own quality system requirements.
How do I calculate the correct wire gauge for custom engine harness applications?
Most wire-gauge problems stem from using ampacity charts without accounting for voltage drop. A 20-foot run of 18 AWG handles 16 amps without melting, but drops enough voltage to make sensors read incorrectly. Use a maximum 3% voltage drop in power circuits (0.36V on 12V systems, 0.72V on 24V systems). Sensor circuits need a maximum of 1% (0.12V on 12V systems). Wire gauge charts show ampacity ratings, but actual application requires voltage drop calculations using the formula:
Voltage Drop = (2 × Length × Current × Resistance per foot) ÷ 1000.
The “2” factor accounts for current traveling through both supply and ground conductors. Undersizing by one gauge (using 18 AWG instead of 16 AWG) cuts copper cost but creates a voltage drop that causes component malfunction under load. Factor in temperature derating: wire ampacity drops 20-30% at elevated temperatures near exhaust components.
What’s the typical lead time for custom engine wiring harness production?
Initial custom harness orders require 8 to 16 weeks from the date of purchase order to delivery. This includes engineering validation (2-3 weeks), tooling fabrication (3-4 weeks), first article inspection (1-2 weeks), and production (2-4 weeks). Repeat orders with validated tooling can be shortened to 4 to 8 weeks.
Expedited production adds a 25-50% cost premium and compresses timelines by approximately 30%.
Complex harnesses with over-molded connectors, multiple branches, or specialized materials extend lead times. Plan inventory safety stock to cover lead time plus buffer for demand variation. Rush orders for equipment launches or field retrofit programs require supplier capacity confirmation 90 days minimum before required delivery.
How does operating environment affect engine harness insulation material selection?
Operating temperature determines insulation material. Standard PVC works to 105°C. GXL cross-linked polyethylene handles 125°C. TXL thin-wall cross-linked insulation withstands 150°C for routing near exhaust manifolds. SXL silicone insulation withstands 200°C for extreme-heat applications.
Chemical exposure requires specific materials: hydraulic fluid exposure needs fluoropolymer insulation, DEF (diesel exhaust fluid) contact requires materials resistant to urea solution.
Abrasion resistance matters for harnesses routed through sheet metal grommets or against vibrating components.
Temperature cycling creates insulation stress: material rated for continuous 150°C operation may fail at lower temperatures if thermal cycling causes expansion/contraction fatigue. Match insulation temperature rating to actual measured temperatures plus 25°C safety margin.
What are typical minimum order quantities for custom engine harness production?
Custom harness suppliers require 100 to 500 piece minimums for initial production runs to amortize tooling costs across sufficient volume. Tooling investments range from $2,000 to $15,000, depending on harness complexity, connector count, and over-molding requirements.
Volume production above 1,000 pieces annually qualifies for reduced per-unit pricing as fixed tooling costs are spread across larger quantities. Low-volume applications (under 100 pieces annually) face three options: pay higher per-unit pricing that amortizes tooling over small quantities, combine orders with other customers building similar harnesses to reach minimum quantities, or use off-the-shelf harness components with field assembly rather than custom production. Some suppliers waive minimum order quantities for development programs with volume production commitments.
Get Your Free Sample!
Explore our custom services now. Email us at sales@wiringo.com for more details.